Sunday, October 31, 2010

And the winners are...

!st prize: $150 gift certificate to Elle and Kate 

2nd prize: Grab bag from Wild Sage valued at $100. 

3rd prize: $40 gift certificate to Cranberries and Capers.

Thank you to everyone who participated! We loved all the ideas. I can't wait to do them next Halloween. Congratulations to our winners and have a Happy Halloween!!

Saturday, October 30, 2010

Last call for entries!

Contest ends today at 12am eastern standard time. So get those entries in:)

Friday, October 29, 2010

DIY ENTRY #30 Witch Shoes (props)

Erin Quinn sent over another great one (I know, I have really talented sisters). I will be doing this one next year to have right next to my front door.

I made these to put by the door under a "Witch Parking" sign that my friend made for our Witches' Lunch. :)  I was originally going to sew little witch shoe covers, but ended up making them super quick by just using craft foam.  And I like super quick. :)

Things you need:
1 pair of black heels (no damage will be done - it's just a temporary change :)
1 piece black craft foam (i think the standard size is about 5 1/2" x 8 1/2" - the ones that come packaged in a stack of different colors)
1 piece green craft foam
Black electrical tape (I just saw some at Dollar Tree tonight - $1 for 2 rolls - good deal)

First,  pick a pair of shoes you'd like to enhance temporarily to look like witch shoes.  I used a pair of black heels with pointy toes that I have.  


I cut 3 things out of the craft foam: (see picture of cut outs to understand my descriptions below)
1) 2 pieces of black foam that are about the size of the front of the shoe plus a long strip at the top of the point (cut it large enough to wrap down the sides of the front of the shoe plus include a large long piece at the top that you can curl up to look like a curled up toe)
2) I used scraps from the sheet of black foam I used to cut 2 tall trapezoid type shapes (1 for each shoe).  These will be the tongues of the witch shoes. 
3) I cut 2 green pieces the shape of buckles 
*Note: the 2 different black foam pieces for each shoe could probably be cut out as one piece, but you would need 2 pieces of black foam.  I only had one piece, so I made it work. :)

Next: Attach each black foam triangle (with the long strip at the pointy end) onto each shoe by running electrical tape across the bottom of the shoe.  You want the tape to "grab" the foam on each side (*note - the electrical tape should only touch the bottom of the shoes to prevent any damage)

Next: Tuck the "tongue" of the shoe into the black foam piece you've just attached to the shoe to form the tongue of the witch's shoes.  

Next: Tape the "buckle" onto the shoe (make sure to cover the "line" that's created where the tongue is tucked into the other foam piece to give it a cleaner look).

Next:  Cut shoe inserts out of a fun paper... or plain bright green... or you could stamp spiders onto plain white paper, etc. I traced around my running shoe inserts for a pattern, but had to cut them down quite a bit - a little trial and error to get a decent fit. Insert shoe inserts (I didn't attach them - I just stuck them in.) 
You could do all sorts of embellishments on them too (I just ran out of time :) ) - feathers, black flowers, spiders, etc.  

Happy Halloween

DIY ENTRY #29 Spooky Old Tree - Contact Paper :)


Thank you Erin Quinn for sending in this one. I LOVE it!!! Anything cheep and easy is up my alley.


So I've been wanting to add a spooky old tree on the wall the last few years for Halloween, but never quite get around to it.  For years I thought I'd use black butcher paper and thought that would work pretty well, but this past summer I came across an idea on the internet (http://www.instructables.com/id/DIY-Vinyl-Wall-Art/) to use black contact paper to create wall graphics (instead of buying expensive vinyl designs) and I knew right then I was going to do my Halloween Trees with contact paper. :)  And after these trees I'm absolutely hooked on contact paper!  There are so many uses for the stuff! :) (And actually when I referred back to the website with the contact paper graphics later, I saw that she'd made trees for her bedroom to create a headboard wall, so apparently great minds think alike. :) 

So here's how I made my trees:


List of what you'll need:
1 roll black contact paper (I found mine at Home Depot for about $6.50 for a roll of 18" x 15' black faux leather contact paper, which I've made 3 scrawny 7 foot trees out of and still have some small scraps to play with)
1 pair of scissors


I decided to cut the main trunk for the trees separate from all of the tall branches (I think it gives you more flexibility, less errors are possible (as opposed to trying to draw it all out first, and I think it's the best way to use as little contact paper as possible - less waste :) )

Hold the contact paper up against the wall to measure about where you want the main bottom truck to end and the branches to begin so you know how tall to make the main trunk.  Then cut out a trunk (contact paper cuts like butter - super easy - you just hold the scissors slightly open and move 'em forward) and apply it to the wall (by peeling the back off of the contact paper).  *You could draw the trunk out on the back of the contact paper and then cut it out but its really not necessary. 

After applying the trunk where you want it on the wall, then cut tapering branches the length you want them and start to apply them from the trunk upward and outward. Just barely overlap the edges of the contact paper and you won't be able to tell that they're separate pieces - everyone that sees them thinks they're one solid piece.
 Next, cut smaller (and random size) tapering branches and apply. 

When branches don't look quite right or are too thin in places or don't quite connect to each other, then cut more pieces of contact paper to "fill in" the holes.  You'll never be able to see it! :)

I added a paper cut out raven (black cardstock with double stick tape on the back) on one of the branches that is inspired by a Martha Stewart template a few years back.  

A few ideas that I'm going to add/try later with the tree - add more ravens and an owl (which you could cut out of cardstock or the contact paper).  I've also thought about "wrapping" - a least giving the appearance of wrapping -  a string of orange lights "around" the tree by attaching them onto the tree with black electrical tape so that you can't see the tape.  I'm sure you can all think of even more fabulous ideas!  (A bunch of friends want me to keep these up year round and I thought it could be fun to "decorate" them for each holiday.)

***And a note: Since finishing this project, I've now found contact paper at the dollar store (not black, but you could spray paint it black (those $.94 cans from Walmart would do the trick) or you could spray paint it any other color for that matter.  At "Dollar Tree" its $1 for an 18" x 9' roll, so you could get the same amount I did for only $2!! .... and you might get lucky and even find the color you want so you don't have to paint it!... or you could do a spooky white tree or a brown wood grain tree... the possibilities are endless!!! :) 

Happy Halloween!

Thursday, October 28, 2010

DIY ENTRY #28 Candy Corn Cupcake Stand

This project is for me! Maybe if I glued them to something I wouldn't eat all of them. Just kidding, I would definitely pick them off and eat them with the glue on. Another great entry from Christine over at Pure Joy Events.


Who doesn't love candy corn? It's a Halloween staple. Like every kid, I use to bite off the white tips and pretend they were vampire fangs. I couldn't help eating one or two, even when I was working on this candy corn cupcake stand.


For this tutorial, you'll just need three sheets of white 12"x12" glitter card stock (this one is from American Crafts purchased at AC Moore), 14" and 10" cake circles (from Michael's), a glass vase, two-sided tape, glue, and three 9 oz bags of candy corn.
  1. Trace and cut one sheet of glitter card stock using the 10" cake circle as a template. 
  2. Glue the card stock on top of the white side of the cake circle.
  3. Cut 3/16" strips of the card stock and glue to the sides of the cake circle.
  4. Now for the fun part. Glue candy corn along the edge of the cake circle.

  5. Repeat steps 1 through 4 with the 14" cake circle.
  6. Fill the glass vase with candy corn. Then put two-sided tape along the lip of the vase and set the 10" cake circle on top.

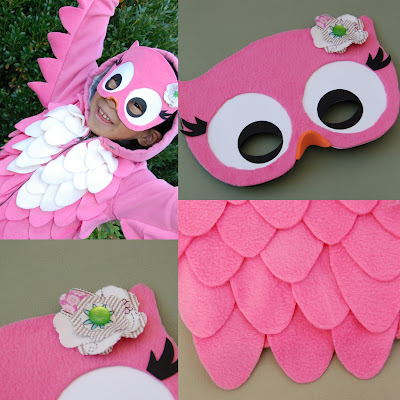
DIY ENTRY #27 Pink Owl Treat Pail

This is absolutely brilliant! My girls so desperately want their pails to math their costumes. Why didn't I think of that! That owl costume just got cuter (didn't think it could). Thank you Christine (my daughters middle name) over at Pure Joy Events:)

For this project, you'll need a plastic pumpkin pail (purchased at Target years ago for about $1), pink and cream fleece (felt will work too although more of the pail color may show through), white glue, package of black and orange foam masks (purchased at Jo-Ann Fabrics and Crafts), and one sheet of white cardstock.
  1. Using Owl Template 1, cut approximately sixty individual feathers and the mask out of the pink fleece. Then cut about five individual feathers out of the cream fleece. The wing template will not be used for this project.
  2. Print Owl Template 2 on white cardstock and cut out the pieces. Cut the beak out of the orange foam mask. For pictures on how to create the mask, see the pink owl costume tutorial.
  3. Glue the pink mask on top of white mask, the black circles for the eyes, and then the lashes.
  4. Turn over the mask and glue on the black foam mask and orange beak.
  5. Starting at the bottom of the orange pail, glue a row of pink feathers. Create overlapping layers of feathers as you work your way up the pail.

  6. Glue the mask just above the cream chest. Lastly, glue down the first two rows of feathers to the bottom of the pail, so they don't flare out.


If you have made the pink owl costume and/or the matching treat pail, I would love to post your pictures!

DIY ENTRY #26 Owl Costume


They absolutely do not get better than this. Christine over at Pure Joy Events just sent this over. There is so much I love about it. 
But I think I really love that she makes it look SO easy!


Here's "hooo" to turn a simple hoodie into an owl Halloween costume. For this project, you'll need a pink hoodie (purchased at H&M), pink and cream fleece (felt will work too), white glue, package of black and orange foam masks (purchased at Jo-Ann Fabrics and Crafts), one sheet of white cardstock, and a rosette.
owl Halloween costume tutorial
  1. Using Owl Template 1, cut a set of wings, approximately sixty individual feathers, and the mask out of the pink fleece. Then cut about twenty individual feathers out of the cream fleece.
  2. Starting at the bottom of the hoodie, sew (or glue if the hoodie won't be worn after Halloween) a row of pink feathers. Create overlapping layers of feathers as you work your way up the hoodie.
    owl Halloween costume tutorial
    owl Halloween costume tutorial

  3. Flip the hoodie to the back and sew the wings along the seam of the arms.
    owl Halloween costume tutorial

  4. Print Owl Template 2 on white cardstock and cut out the pieces. Cut the beak out of the orange foam mask.
  5. Line the black foam mask along the bottom of the white mask and cut out the eye holes.
    owl Halloween costume tutorial

  6. Glue the pink mask on top of white mask, the black circles over the eye cut outs, and then the lashes.
    owl Halloween costume tutorial

  7. Turn over the mask and cut out the eye holes. Then glue on the black foam mask and orange beak.
    owl Halloween costume tutorial

  8. Add a rosette a you're "owl" done.

DIY ENTRY #25 Giant Halloween Crayons


What child (ok, and me) wouldn't LOVE this little project! Tere Lauritsen from Pony Tails & Fish Scales sent this all around cute craft in.


Here are our giant Halloween crayons we made from numerous old broken crayons.
Above is the setup.
A cup for the trash peelings, meat cutters for cutting crayons, a bag filled with old abandoned crayons, a bowl for the naked ones and the shaper tray.
Important note...the $1 store trays do not withstand 275 degrees!
The cute pumpkin tray now looks like deflated hot air balloons.
They didn't turn out too bad but they are not as shiny as the next ones we made.
I got out my good 'ole trusty Wilton Halloween treat pan and sprayed it with veg. oil.


Ella put all the crayon pieces in the shapes.
Above is what it looked like after a trip to the oven at 275 degrees until melted, a cool off and then the fridge.
Here they are after being dumped out of the pan.
Pumpkin
Cat
The picture at the very top of the post shows what they look like when you separate the colors a bit~greens together, yellows, oranges, blues, etc.
My 4 and 6 year old loved peeling the crayon paper off and putting the pieces in the pans.  This is a great kid craft
 (except for the oven part!)

*am placing each crayon in a snack sized zip lock bag for the girls' teachers to place in the classroom treasure chests.
*Great kid gifts also!

Wednesday, October 27, 2010

DIY ENTRY #24 halloween candles


The OH SO TALENTED Ashley Schmutz of Marla Ruby interiors sent in these candles. I LOVE absolutely everything this girl does. If you have not had a chance yet to check out her design blog.. do so now right here.


what you'll need:
-tapered white candles
-paint tape
-paint (color of your choice)
-paint brush
-glue
-glitter
-any festive accessory to add to your candle

what to do:
1. buy a pack of white candles (i bought european tapered candles from tjmaxx)

2. tape the candles in any pattern you would like.  (i went for the candy stripe look)


3. pick a paint color and paint in between the tape lines on your candle.  you'll need to let the paint dry and put on a few coats if you want your pattern to be smooth and dramatic.

4. carefully peel tape off.  some paint will peel off with the tape if you rush this step.

i thought i was done there, but some of my paint bled through the tape.  i just couldn't settle for imperfect lines!

so, i brought out the glitter.
you can cover the whole "white" section with glue and glitter the whole thing, but i wanted little lines of glitter to define my black paint.

for the glitter effect.
1. get out your glue, glitter, and paint brush
2. paint a thin line of glue onto the candle right where the paint meets the plain candle wax

3. GENEROUSLY sprinkle glitter onto the glue.
4.  do this for each black/white line.  
5. after glittering your candle, run your finger above and below each glitter line to take off excess glitter.  this will clean up your overall look.

and now you have some beautiful blingbling holiday candles!
(i can't wait to make some for valentine's day!)

add any accessories to this.  i think i with throw on a few spiders... why not?


HAPPY HALLOWEEN!
xoxo
ashley

LinkWithin

Related Posts with Thumbnails